My Photography

Showing posts with label recipes. Show all posts

Monday, November 17, 2014

These almond flour Chocolate Chunk Cookies are hard to beat

When I was in junior high and high school I used to make chocolate chip cookies all the time. We're hosting a book club or Latin class or a potluck at our house? Chocolate chip cookies. We're going to any event ever and we need to bring a dessert? Chocolate chip cookies. I'm going over to a friend's house to hang out? Let's make chocolate chip cookies together! We just want a nice dessert? Chocolate chip cookies.

But wait... there's more to these cookies than meets the eye!

In our family of nine the process of making cookies took a bit of time... I had to double or triple the recipe, invite a little sister or two to "help", and deal with big ole fingers of three brothers and a dad who'd somehow pass by the kitchen so often when they heard those three magical words. Just scooping out three batches of cookies onto pans, baking them (without burning them!) removing them to cool and repeating at least twice was a handful, but I had the recipe and process down to a science. And my cookies were GOOD. When I went to college I'd often hear about mom making cookies and my little sibs complain how they just weren't the same. Recently my sister Maria has taken up the gauntlet at home and makes some pretty killer cookies, but I flatter myself saying she learned from the best. 

Given this background, imagine my dismay at 21 years old learning that I am allergic to wheat. Bread is hard to live without but cookies??? Seemed impossible. But for four years I managed the impossible and went without. Then not long ago the craving hit so hard that I determined to find a recipe that would work for me. A recipe with honey instead of sugar, with almond flour instead of wheat, and in which I'd cut up a chocolate bar into chunks since normal sized chocolate chips aren't being imported here for the moment. And, despite my conviction I wouldn't find anything remotely resembling what I used to whip up, I did.


These cookies are not only much healthier than the sugar/wheat variety, but I swear they taste better. They're richer and give you a pleasant sensation of heaviness due to the almond flour, meaning you really can't eat more than two at a time even if you wanted. Othman LOVES them too, and he's all about the sugar (and wheat) so that endorsement is a pretty weighty one.

So without further ado, here is the recipe I took from Wellness Mama  and adapted to meet my own needs. 


Almond Flour Chocolate Chunk Cookies

Ingredients:
-2 cups almond flour
-1/2 t baking soda
-1/4 t salt
-1/2 cup melted butter or coconut oil
-1/3 cup honey
-1 large egg
-1 1/2 T vanilla extract
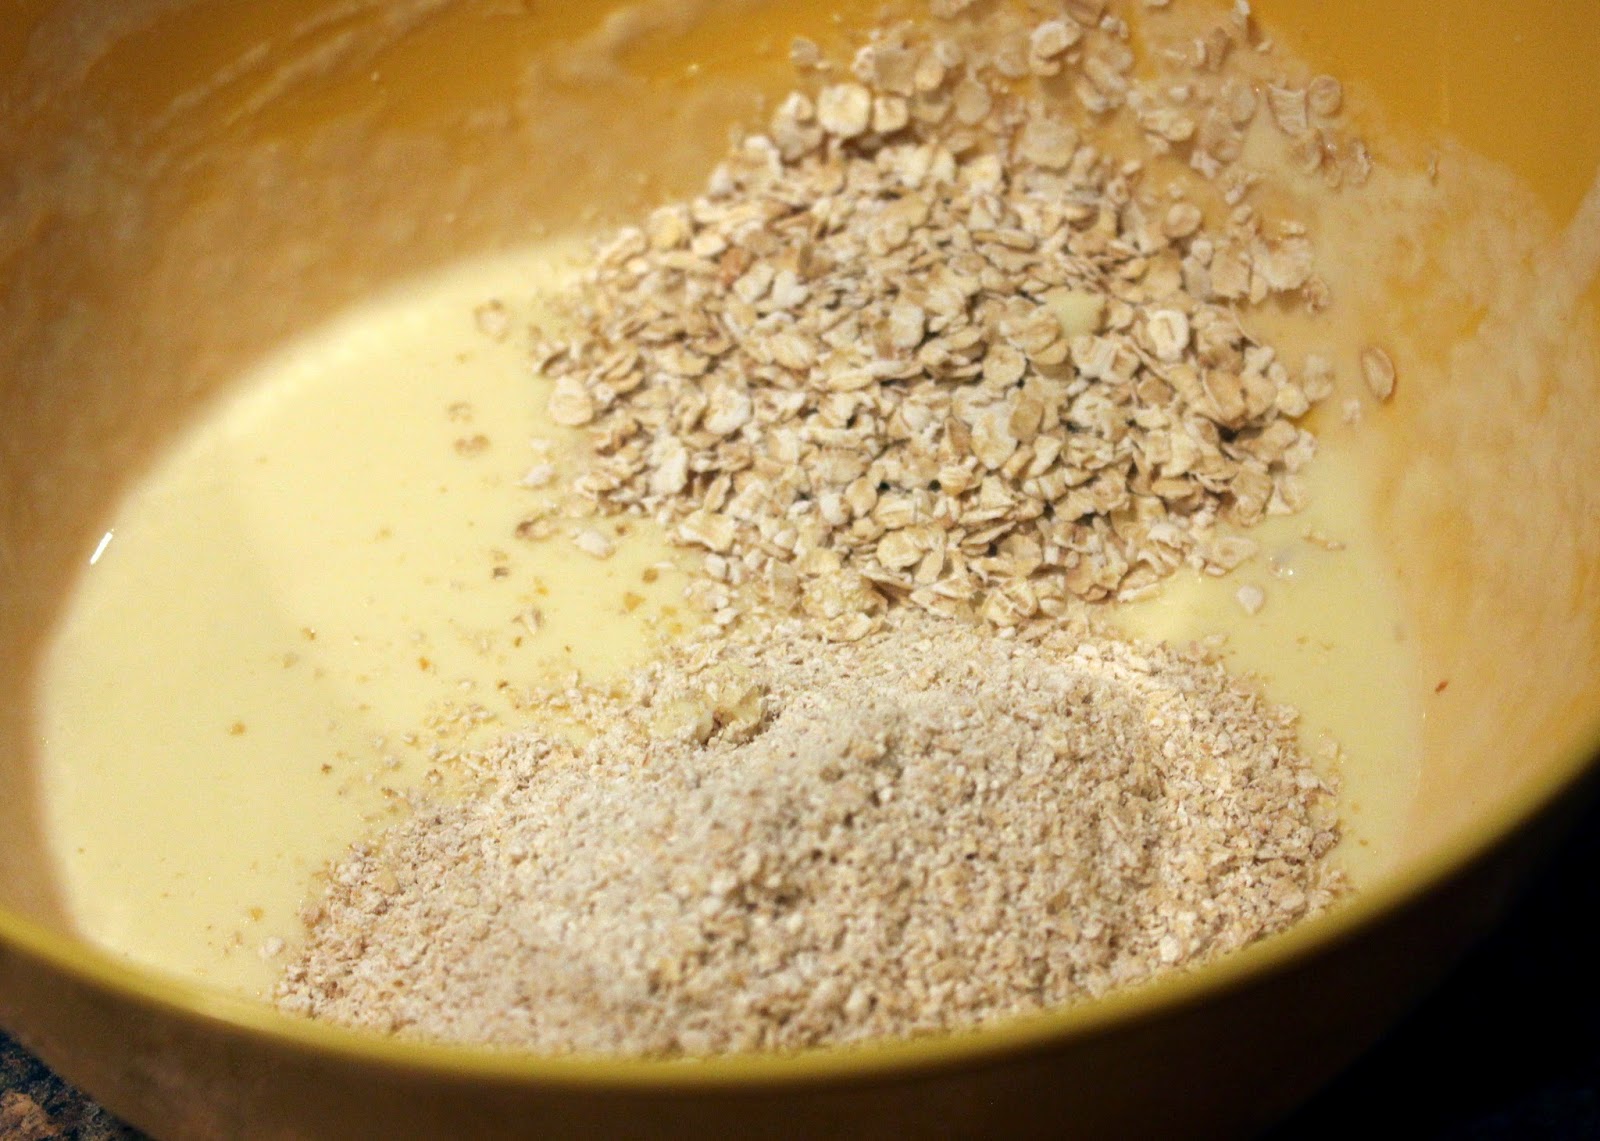
-up to 1/2 cup oats
-1 cup chocolate chunks OR 3/4 cup chopped chocolate bar chunks
-1/2 cup walnuts (optional)

Put the first three ingredients into a bowl and mix with a fork to separate any clumps in the almond flour.

In a separate bowl combine the butter or coconut oil with the honey and stir vigorously until it's totally combined and has a creamy consistency (you can use an immersion blender for this if desired).

Add the egg and the vanilla to the wet mixture and mix well.

Pour the wet mixture into the bowl with the dry ingredients and mix until a dough forms. 


Add the oats until you've achieved the desired consistency, then add the chocolate and nuts if desired. 


Drop small tablespoons of dough onto a silicone baking sheet or well-greased conventional baking sheet, and shape slightly with fingers (they won't really spread or get bigger while baking). 


Bake at 350F for about 10 minutes, but keep an eye on them! When you get them out be very gentle when removing them from the pan (this is why silicone is best) because they will be very soft. After about 5 minutes of cooling they'll be hard enough to pick up and eat!

Enjoy these cookies fresh out of the oven, or the Braga-Henebry way--frozen! Put them in a gallon ziplock bag and freeze them, and when you feel like a treat grab one and eat it straight from the freezer. So delicious. Enjoy!!

Note: to make these GAPS-friendly simply take out the oats, which are important but not essential for these to turn out well.


Thursday, September 4, 2014

Heaven in a pie

Do you like coconut? How about chocolate? Do you like chocolate and coconut in your desserts? Do you like chocolate/coconut desserts that are decadent but don't make you feel horrible for eating them? Do you chocolate/coconut desserts that are decadent, healthy AND easy to make?? Finally, does this look good??


I hope you answered yes to all of those. If you didn't, this post isn't for you.


Chocolate coconut pie

Crust:
- 2 egg whites
- 2 cups +/- unsweetened shredded coconut (Can be sweetened if that's REALLY all there is, but it makes the whole thing way too sweet in my opinion. Also, the smaller the flakes are, the better.)
- Honey/sugar to taste
- Pinch of salt
- A bit of vanilla extract


Filling:
- 2 egg yolks (See what I did there??)
- 1 bar unsweetened or semisweet baking chocolate
- A nice big splash of vanilla extract
honey/sugar to taste if unsweetened
- 1 cup coconut milk (This is about a half a can, NOT a whole one— if you put that much it’ll be a gloopy mess. Trust me on that one.)
 
For the crust, mix all ingredients together, and it should be slightly sticky. Press the mixture with your fingers to the bottom of a well-oiled pie pan, leaving a small edge all around the pan. Bake for roughly 15 minutes at 350°F, until edges and top are slightly browned.

Meanwhile, combine the filling ingredients in a small saucepan and melt on low heat, mixing constantly.

Once crust is out, let cool a couple of minutes, then add the chocolate filling on top. Let cool, once it’s about room temperature put it in the fridge until it’s time to eat.

I’m sure you could put whipped cream or raspberry sauce or something on the finished product and it would be lovely, but it’s so delicious I’ve never craved anything extra.

These pics are from when I made this for approximately the ten thousandth time, but was at home this past summer and actually thought about photographing it. The ingredients I use in Casablanca are slightly different, but whether American or Moroccan made, it's still so so good. I make this every year to take to work on my birthday and people talk about it all year long. THAT'S how good it is. (Othman just looked at this as I finished it up, and his comment was: "What, you're only posting that now?" Because it really is my favorite thing in the world.) So do yourself a favor and make it yourself you won't regret it.


Saturday, July 26, 2014

Oat pancakes

These little guys have been a staple in my diet for about 6 months now, and it's rather a surprise I haven't blogged about them yet. When I'm craving a bread-like thing that I can hold in my hands and bite into, these pancakes are perfect. They can be savory or sweet and they're SO easy to make. They served as my lunch this spring a bit more often than I'd like to admit!

I originally got the recipe from the back of a oatmeal package that Othman's cousin got for me during our Christmas in France. I hadn't been eating oats since they're not GAPS but since she had bought them for me I decided to see if I could re-introduce them to my diet, and was thrilled when the result was successful! I adapted the recipe a bit into what's below.

This morning I ran out of coconut milk and was poking around in the fridge and saw some organic raspberry jam, and a big ole craving hit. I can't eat bagels or toast, but oat pancakes? Sure why not! So without further ado:


Easy Oat Pancakes (Wheat-, lactose-, nut-, sugar- free)
(This makes a good size lunch/brunch/breakfast for one person)

Ingredients:
-2 big tablespoons of plain yogurt
-1 egg
-2 tablespoons oat flour (just take oats and ground them up in a food processor or coffee grinder for 10 seconds or so)
-another tablespoon whole oats for texture
-pinch of salt
-if sweet think about adding: a teaspoon honey/sugar, vanilla extract, cardamom (my favorite spice in these), cinnamon, berries, bits of peaches/apple... whatever you want
-if savory: olive bits, a bit of shredded cheese, oregano... be creative!

Beat the yogurt and egg with a fork until homogeneous. Add the oats, it should be lumpy and have a similar texture to oatmeal. Add whatever spices you want.

To fry, put a generous amount of coconut oil on a skillet and wait till it's HOT. Test with a tiny piece of batter to see if it sizzles immediately. If so, it's good. You don't want it to burn but they'll  be impossible to flip if the skillet isn't hot enough when you put them on.

Make small pancakes by flattening out lumps of batter, and let cook for 2 minutes or so. Flip and let cook for 1 more minute. I like putting a lot of coconut oil so they almost fry in it, but that's just me. 

Enjoy with jam, honey, peanut butter, or use as wheat-free sandwich ends!

Saturday, June 14, 2014

Sushi time!

Last Sunday Othman and I finally got out the sushi-rolling mat and dried seaweed we had bought months before and experimented in making sushi! It was an adventure, but we ended up with some pretty tasty food! I got the sushi rice recipe here and continued with that blog here for rolling instructions. It was harder than the blog made it seem, but that didn't make it any less delicious.

The ingredients (minus the rice vinegar which escaped notice behind me):


The construction station:

Counter clockwise from back: a rolling mat covered in plastic wrap, dried
seaweed, sushi rice in the big bowl, cut cucumber, avocado, salmon, tuna
and sesame seeds! (And a dirty cutting board...)

Somehow I forgot our camera existed after the sushi was all rolled. I would say we were just too hungry and ate them up before I could snap a photo, but actually we made them in the afternoon and ate later on. I guess my brain was too focused on salmon avocado rolls to think about taking photographic evidence of them! There is a shot of our first attempt below, and while I like to think that our later rolls were more... roll-y... to be honest I'm not sure how true that is. 


Anyway I'd definitely recommend using the links above and trying out your own sushi-making session. The ingredients weren't hard to find, and although it took a while--and was very messy--it was all sorts of fun!

Wednesday, June 11, 2014

A chocolate cake for everyone!

After a conversation with a friend online I realized I had never put this recipe on my blog, which is practically a crime since it’s one of my go-tos for cakes. It's light, fluffy and delicious and enjoyed by anyone with tastebuds! It's perfect for birthdays, baby showers, holidays, or just as a pick-me-up for gloomy days. I like to top it with a frosting of cooking bar chocolate combined with butter and vanilla on the stove and poured on top. (Incidentally that combination also makes for a great ice-cream topping for those of you who can indulge.)


The best GAPS Chocolate Cake there is!

Original recipe found here.

Ingredients: 
- 3/4 cup coconut flour
1/2 cup cocoa powder
1 teaspoon salt
- 1 teaspoon baking soda
- 10 eggs
1 cup melted butter or coconut oil
- 1 1/2 cups honey (or a bit less depending on taste)
- 3/4 tablespoon vanilla extract

Combine the dry ingredients in one bowl (sift your coconut flour as needed). Put honey and butter/oil in larger bowl and use a mixer to blend them up nicely. Add the rest of the wet ingredients and blend a bit more. Add the dry ingredients and blend again! Don’t worry about mixing it too much, that isn't really possible. If it seems too liquid-y at first just let it rest for a minute or two, and the coconut flour will begin to absorb and it’ll become thicker.   

I like to bake this cake in two smaller pans (WELL buttered) but you could make a big one, or put the batter in a bread loaf pan or even make cupcakes!

Bake at at 325-350 for 35-40 minutes, but if you’re doing cupcakes keep an eye on them because the cooking time will be shorter. Let cool, demold, frost if you want and enjoy!


Note: these pictures were taken last fall and were meant to be showing off my usage of many wedding/wedding shower gifts, thus the weirdly-placed dirty measuring cups, etc.

Monday, June 2, 2014

Paint and chocolate

Earlier this spring I spent many hours of many days working on this painting on canvas:


but in the end I didn't really like it. I've been looking for someone to give it to as a gift, but it's hard to give away something you don't like yourself. Today Myriam, a friend who I see much too seldom, came over to hang out and paint. She doesn't paint herself but has always wanted to, and knowing that feeling well I encouraged her to come try it out with me! It was a really wonderful day, and as an added bonus I was granted the opportunity to give the above painting to someone who liked it! 


yummmmm

We spent a really nice afternoon eating my sugar-dairy-gluten-free chocolates (recipe to come), drinking tea, talking together and painting up a storm. The painting she left with at the end of the day is so hopeful and bright and happy, looks rather Moroccan and really reflects her personality! Best of all she did the whole thing herself, from the design to the finishing touches, with very minor guidance from me. 


 At the same time I worked on a piece I had begun a week or two ago, which I think I'm done with now. It's a different style from what I've done before and I like it!


I, in turn, got guidance and help from Ingridthe catalyst of my own painting adventurewho stopped by at lunchtime to share in our wonderful afternoon for an hour or two. 


Myriam went home all smiles, with two paintings and some coconut oil in hand, the better to make chocolates with! Assessment: friendship, conversation, chocolate, painting and Yo-Yo Ma's Bach Cello Suites make for some seriously lovely times.


Easy, guilt-free GAPS chocolates

We all know that chocolate is good for our health, it's just all the junk and sugar that come with it that are bad. With this recipe you skip the nastiness and have total control over what goes in, and makes your guilty pleasure guiltless! It's like being a kid all over again.

Ingredients:
-good quality coconut oil
-cocoa powder
-honey
-salt


Optional:
-vanilla extract
-shredded coconut
-coffee grounds
-chopped raisins

Mix equal parts coconut oil (in liquid state) and cocoa powder with a fork till smooth. Add honey and salt to taste. That's your chocolate! Easy!

Now comes the fun part, where options abound: pour it into silicone molds, pop them in freezer and be done, or add one or more of the optional flavorings above and follow same procedure, or freeze some chocolate in the bottom of the molds and add shredded coconut (mixed with a bit of honey to make it pack-able) on top and then more chocolate, etc etc etc. So many options, so much yumminess, so little guilt!

Keep them in molds in the freezer, as you can see from the photos the coconut oil melts very quickly—too fast to take a decent picturebut that melt-in-your-mouth goodness is simply an added bonus. 

Eat, smile, enjoy!

Monday, March 3, 2014

Moroccan carrot-orange salad

This Moroccan salad is a favorite of mine, and it's so versatile--it can be a side dish, as it is here, a dessert or even a breakfast! It's extremely healthy yet so delicious it feels somehow naughty.


Ingredients:
-1 large carrot
-3 oranges
-a handful of golden raisins
-cinnamon
-honey or sugar to taste (unneeded if your oranges are sweet)

Shred the carrot finely, either in a food processor or with the small holes of a grater. Squeeze the juice from the oranges in a medium bowl and combine everything. (Tip: I would very much recommend against using store-bought orange juice in this.) Best if covered and refrigerated at least 30 minutes before being eaten, but delicious freshly made as well. 


My chronic sinus infection flared up again last week and I was mostly horizontal for a couple of days. Othman made this for me and brought it on a tray to have as breakfast in bed on Sunday. He's a keeper. =] He made way more than I could eat, and when I was feeling a bit better the next day I put the rest in a little bowl to be photographed!

Wednesday, February 12, 2014

Coconut fish!

In my last post I mentioned how I recently made my mom's delicious coconut fish. This recipe is a tried and true favorite especially for guests. Othman's parents loved it when they dined at our place last! The combinations are endless-- my recipe is very different from the original one of my mom's, but here's how I generally make it.


Ingredients:

-2 filets of fish (fresh or frozen but something white with a light taste)
-2-3 leeks (or one onion), chopped finely
-2-3 cloves garlic, crushed
-a bunch of fresh button mushrooms, peeled and diced
-1 can coconut milk
-salt and pepper
-fresh herbs (I used parsley, cilantro and dill)

In a large saucepan or extra large high-sided skillet, saute the leeks with the garlic in olive oil. Stir frequently so that the leeks don't burn. When slightly translucent and fragrant add mushrooms and saute until they've shrunk a bit. Add coconut milk, salt, and pepper, and gently place fish filets side by side. Do not stir. Turn to medium-low and cover lightly. Do not stir. Let cook for 20 minutes or until fish is cooked and falls apart easily. Remove from heat and throw fresh herbs on top. Serve over rice. 

I haven't really found a GAPS-friendly alternative to the rice, since this is very sauce-y, and since I don't have a problem with rice I haven't tried too hard. Definitely let me know in the comments if you find a good substitute.

My mom's recipe involves chopped tomatoes, and zucchini is wonderful as well. It's really just the onion/leeks and the coconut milk that are necessary. She even changes the fish for chicken pieces sometimes! One way or another, it's an easy and delicious dinner that's worth a try!

Friday, January 10, 2014

Fish fish fish

I went back to work this week, and though I've been to busy to post, last Sunday I took some pictures with this post in mind of a wonderful dinner Othman and I made together.

Although Casablanca is on the coast we eat far too little seafood from day to day, and this meal was an attempt to keep up the fish intake! We got this beautiful fish from a shop that specializes in fresh seafood, owned by a favorite of Othman's uncles. For those of you in Casa, Poissonnerie Marisco is around the corner from the Velodrome Carrefour Market. Their fish is super fresh, the shop is very clean and it all comes at an affordable price-- cheaper than any of the grocery stores. They'll even deliver! We've never been disappointed with the food or the service, and I would definitely recommend checking it out.

Ready to go in the oven, rubbed with olive oil and
stuffed with lemon slices, fresh mushrooms and
herbs (dill, parsley and cilantro). 

Boiled new potatoes with butter and herbs. Yummm.

Polish miseria salad, an absolute favorite of mine since rediscovering
 it this summer when our Polish pseudo-relatives came for the wedding.
 I was convinced I found the recipe on this blog and just spent many more
 minutes than I should have rereading Nichole's posts (like this one, a favorite
 of mine coincidentally posted on my birthday last year). While apparently
 she didn't supply the recipe, I grew up with her mother in law's version,
and while mine isn't quite up to par, it's still delish.

Fresh mushrooms sauteed with butter and red wine.

Ready to eat! Not quite as pretty now, but much more tasty.

Homemade, easy, delicious and GAPS-friendly dinner, along
with some fancy french mustard. Doesn't get much better than this.

Friday, December 20, 2013

GAPS Pumpkin Pie!

Third in my Holiday goodies recipe list: GAPS pumpkin pie! I absolutely LOVE pumpkin pie and had to find a good recipe for this fall staple. In Morocco we can't get canned pumpkin, and don't even have the orange variety-- pumpkins here are green on the outside, much bigger and a bit more watery than what you find in the US. But I've made it work, and this recipe is simple and delicious! 
This is my home pureed pumpkin—I cut lot of raw pumpkin into chunks 
(well actually I get Othman to cut for me!) and boil until soft. 
Then I puree it and freeze it in bags to defrost and use when I want!
 Ingredients:
-2 eggs
-2 cups pureed pumpkin (fresh or canned)
-1 cup canned coconut milk
-spices desired (I use ginger, cinnamon, nutmeg, and vanilla, but I tend to over-spice because I like that, so I won’t give you quantities. Just use the same spice ratio you’d  use in a normal pumpkin pie)
-1/2 to 3/4 cup of honey (to taste)
-1/2 cup almond flour OR 2-3 tablespoons coconut flour (Note: coconut flour works better for me, and you may need less if you're using canned pumpkin--just add a bit at a time until you get the right texture.)


Beat eggs slightly, then mix in rest of ingredients.  Pour in greased pie pan and bake at a high temperature (425F) for 15 minutes, then lower temperature (350F or so) for 45 more minutes. I’m not sure why that is, but the original recipe I adapted this from had those instructions, and I haven’t deviated so can’t tell you if it’s necessary or not.

It's very thin before you add
the coconut flour.
With a coconut pie crust!

Try not to over-bake— if it’s still a little jiggly in the middle but a toothpick/knife comes out clean at the edge, it’s done. If you over-bake it still tastes good but you’ll get big cracks and the texture isn’t quite as creamy.


If desired, pour batter in a GAPS coconut crust. It’s good like that, but it’s also delicious crustless. Make one of each if you can’t decide. ;D


I did overbake these ones, and they got big cracks in the middle, so I'm refraining from putting those ugly pictures on here! But even so, they were delicious!!

Thursday, December 19, 2013

GAPS coconut pie crust

Recipes for the holidays number two: coconut pie crust!

This crust is great for no-bake pies, but can be baked with a pie (for example pumpkin) in it. Just be aware that any edge left over the top will be burnt to a crisp, but the rest will be fine!!

Ingredients:
-2 eggs, separated
-1 ½ to 2 cups unsweetened coconut flakes
-2-4 tablespoons honey (to taste)
-2 teaspoons vanilla extract
-1/2 teaspoon salt

Put egg whites in a medium bowl, add the rest of the ingredients. (I just add the yolks to whatever pie I'm making--can't hurt!) Mix with your hands. Add some coconut if you think it's too wet. It should be easy to mold with your hands but it won't stick together.


Press everything into the bottom of a well-greased pie plate, trying to make it as even as possible. Bake at 350 for 12-15 minutes. I just keep an eye on it until it's nice and golden.


Ready to go!

Posted by Picasa